


.webp?width=250&height=131&name=how-to-use-gdms-q1-2024%20(1).webp)


Last Updated: 04/15/2026
As technology continues to advance, networks within offices, hotels, education spaces, and other verticals have grown more complex. Phones, computers, IoT devices, smart technology, and more can all be simultaneously running across a deployment’s Local Area Network (LAN). This can lead to issues with security, network organization, and scalability. As a result of these roadblocks, Virtual Local Area Networks (VLANs) have become an increasingly popular feature that can help partition physical networks into virtually manageable ones. Within this blog post, we’ll give you an introduction to building VLANs with Grandstream’s GWN layer 2+ switches and Grandstream's GWN layer 3 switches.
Overview of Creating GWN VLANs
Creating a VLAN provides a group of host devices with a common set of requirements that allows them to communicate as if they were attached to the same broadcast domain, regardless of their physical location. A VLAN has the same attributes as a physical LAN but allows for endpoints to be grouped even if they are not on the same GWN switch. When creating VLANs on Grandstream’s GWN series of layer 2+ and layer 3 network switches, the user must first access the WebGUI through the device’s IP address or by using Grandstream’s GDMS Networking or GWN Manager platform. To learn more about our free GWN management platforms, read our blog post here.
Once the user has accessed the GWN switch GUI, a submenu will be labeled “VLAN” under the “Switching” menu option. From here, clicking the “add” button will allow the user to define the VLAN ID, which can be defined as a range and/or individually. After an ID is created, the following settings can be configured:
- Description: A brief comment for the VLAN that can be viewed with the VLAN list
- Member Type: Choose between removing all ports GE/LAG from the VLAN, tag all ports GE/LAG to the VLAN, or untag all ports GE/LAG from the VLAN
- GE: Choose which individual ports are tagged, untagged, or selected
- LAG: Select individually which LAGs are tagged, untagged, or unselected

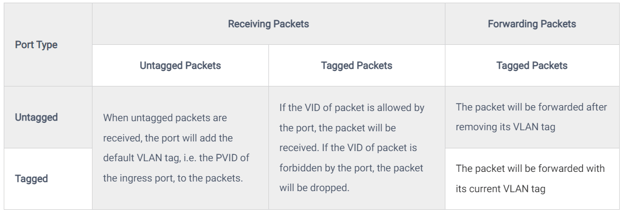
When setting up a VLAN, it is important to include a tagged trunk port in every selection. Grouping devices in VLANs can be done based on device type, departments, and any other organizational strategy desired. If a device is moved and connected to a new port, it's easy to go back into these settings and adjust the port or LAG. For more information and details on Tagged vs Untagged Ports, view the table below.
VLAN Port Settings and VLAN Port Members
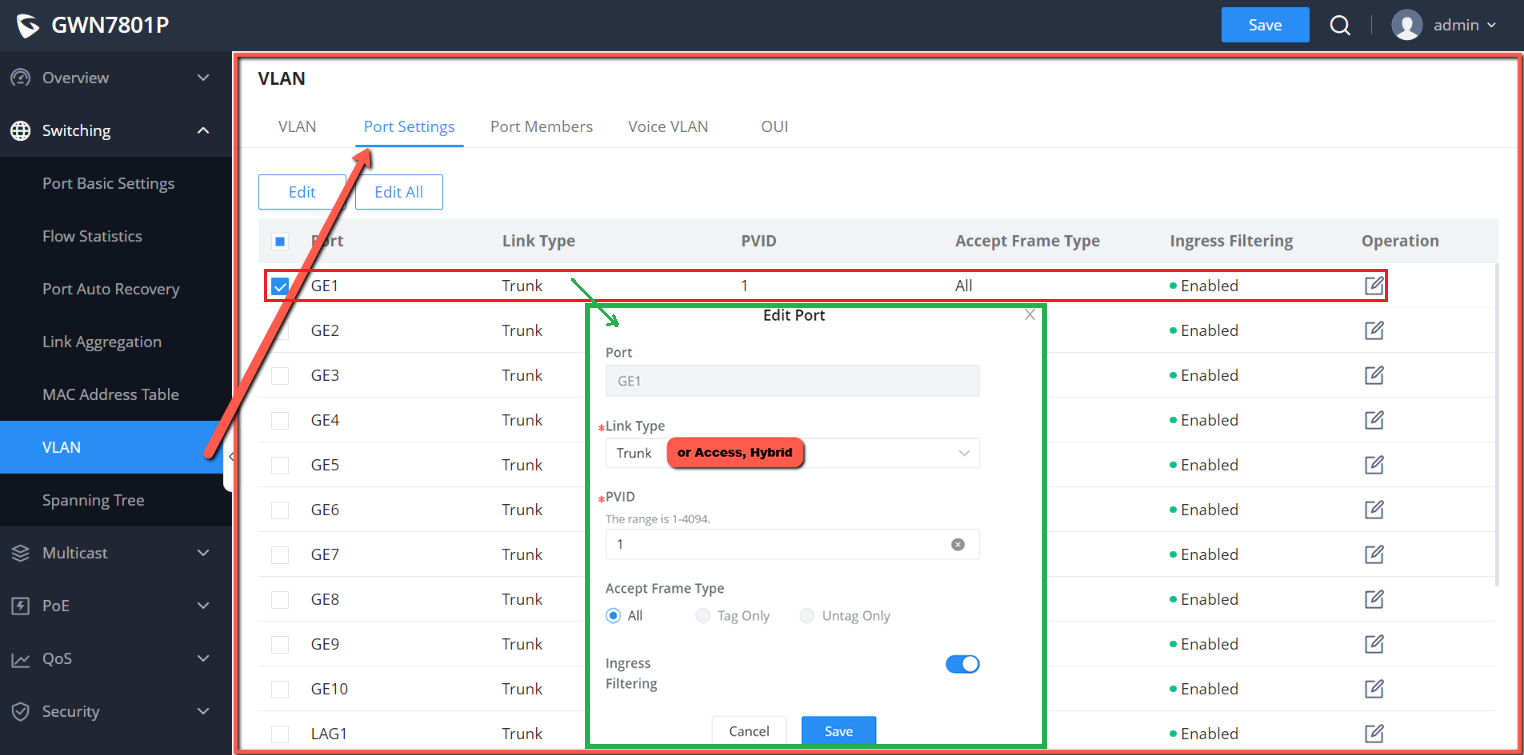
With the VLAN created, the port settings can begin to be configured. The port settings tab within the VLAN submenu allows for configuring VLAN on each of the GWN switch’s ports and LAG by specifying the Link Type (Trunk, Access, and Hybrid) as well as the default VLAN or PVID. The user can also enable Ingress Filtering for the selected port and additionally for the accepted Frame Type. All the ports and LAGs are presented in a list, and adjustments can be made by clicking the configuration option under the “Operation” setting. They can be adjusted in bulk by selecting the ports as they are presented on the list. It's important that the port’s VLAN settings are configured to match the VLANs that were associated with them during the initial VLAN creation in the previous step.
From the Port Members tab of the VLAN submenu, a user can view the Tagged and Untagged VLANs for each port and adjust them individually if needed. Tagged VLANs and untagged VLANs can be entered in either a range or separately.
With port membership and LAGs associated with their corresponding VLAN, broadcast and multicast traffic throughout a deployment will now be compartmentalized into that VLAN. This keeps packet traffic segmented into each VLAN for improved performance and reduced network congestion. Note as well that VLANs must also be configured at the router level since this is where inter-VLAN routing takes place.
Want a complete technical document that covers the GWN Series? View our knowledge base article here.
Voice VLAN Configuration and OUI
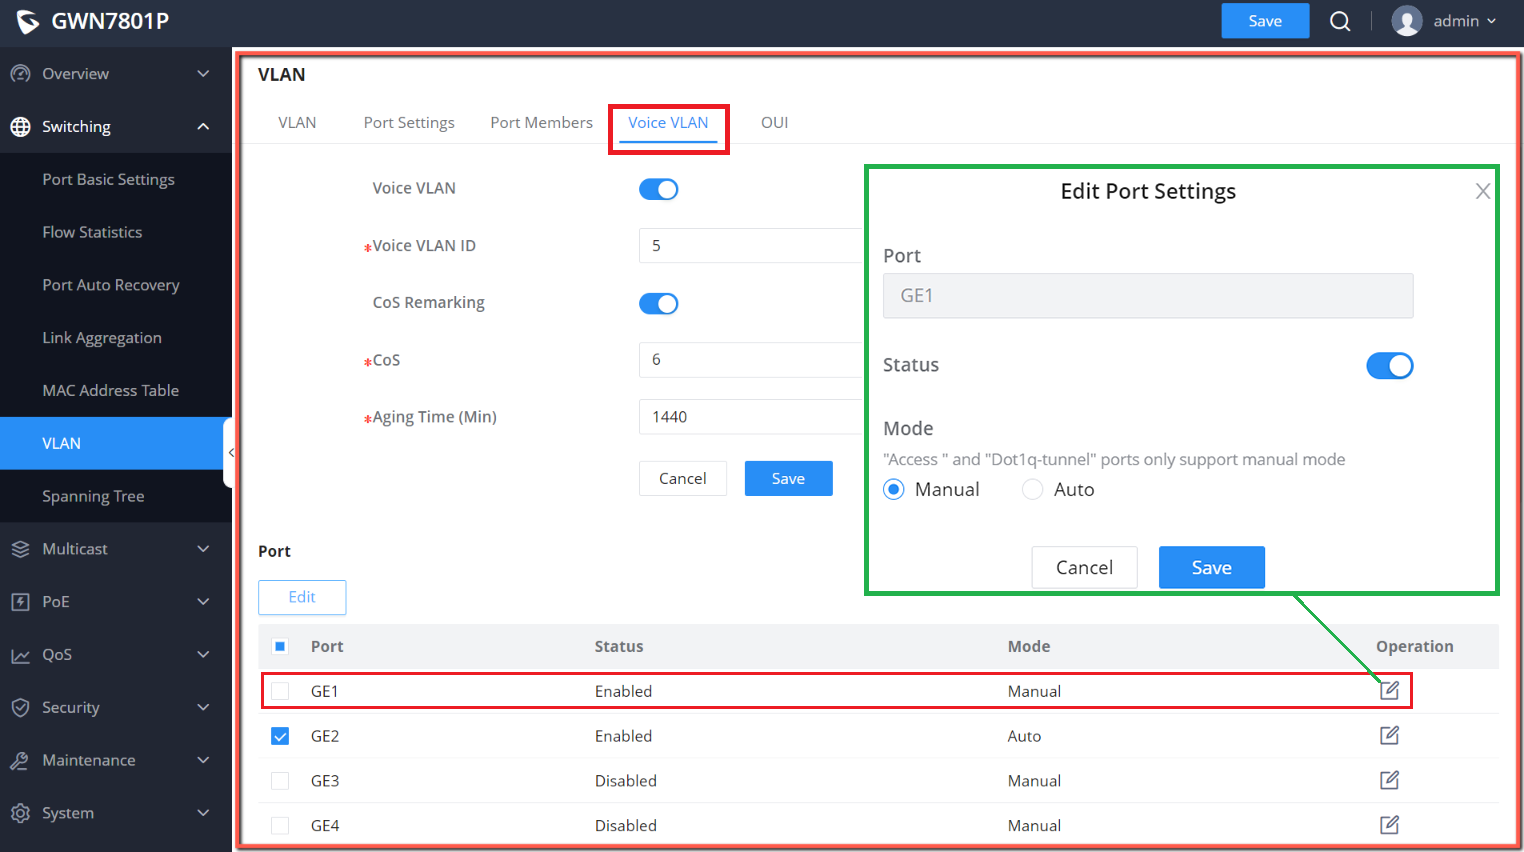
Voice VLANs are an optional setting that can be configured especially for voice data streams with the GWN7800 series of switches. This is an especially useful feature when implementing a complete Grandstream solution with GWN switches, IP phones, and UCM IP PBX. By configuring Voice VLANs and adding ports with voice devices attached, a user can perform QoS-related configuration for voice data, ensuring the transmission priority of voice data streams. This step needs to be done after configuring the VLAN and port settings, however afterward you can activate the Voice VLAN function and begin choosing VLANs that will utilize this feature.
The last feature of the GWN series is its OUI (Organizationally Unique Identifier) capabilities. An OUI address is a unique identifier that is assigned by IEEE (Institute of Electrical and Electronics Engineers) to a device vendor. This feature enables a network administrator to determine the brand of the devices in the network, which is especially helpful for large deployments.
Using GWN Series VLANs
With VLANs configured on a GWN series device, an organization’s network can begin to be segmented. Internal servers can be nested on the same network as their users to ensure other departments cannot access them for increased security. Network access can be provided to specific device groups, and large physical spaces can be brought together under a single network despite geographical location. Grandstream's managed switches, including the GWN7800 Pro Series, our next generation of enterprise layer 2++ managed network switches, have a variety of other features that make them an ideal choice for building out an organizational network. We created a 4-part video series that delivers a detailed overview of the technical capabilities of the series. Watch the playlist below, or head to our YouTube page and view it there.