


.webp?width=250&height=131&name=how-to-use-gdms-q1-2024%20(1).webp)


Last Updated: 04/15/2026
Grandstream's portfolio of networking devices has grown rapidly over the past few years. This trend will only continue with our introduction of more switches, routers, and Wi-Fi access points. While our Wi-Fi access points have built-in controllers that can be used to manage a deployment of APs, a more robust platform solution for configuration, management, and troubleshooting of network infrastructure is often a better choice. Grandstream's GDMS Networking and Grandstream Manager are just this. GDMS Networking and GWN Manager are both free, enterprise-grade, management platforms for Grandstream's access points, routers, and switches. Thanks to streamlined monitoring and maintenance, managing a network or several networks across multiple locations has never been easier.

Within this blog post, we'll be providing an introduction to GDMS Networking and GWN Manager and how to use them. By reading it, you'll learn about:
- The features and capabilities of the GWN management platforms
- How to add and configure devices with GDMS Networking and GWN Manager
- The steps to configure your network settings and options
Features and Capabilities Overview
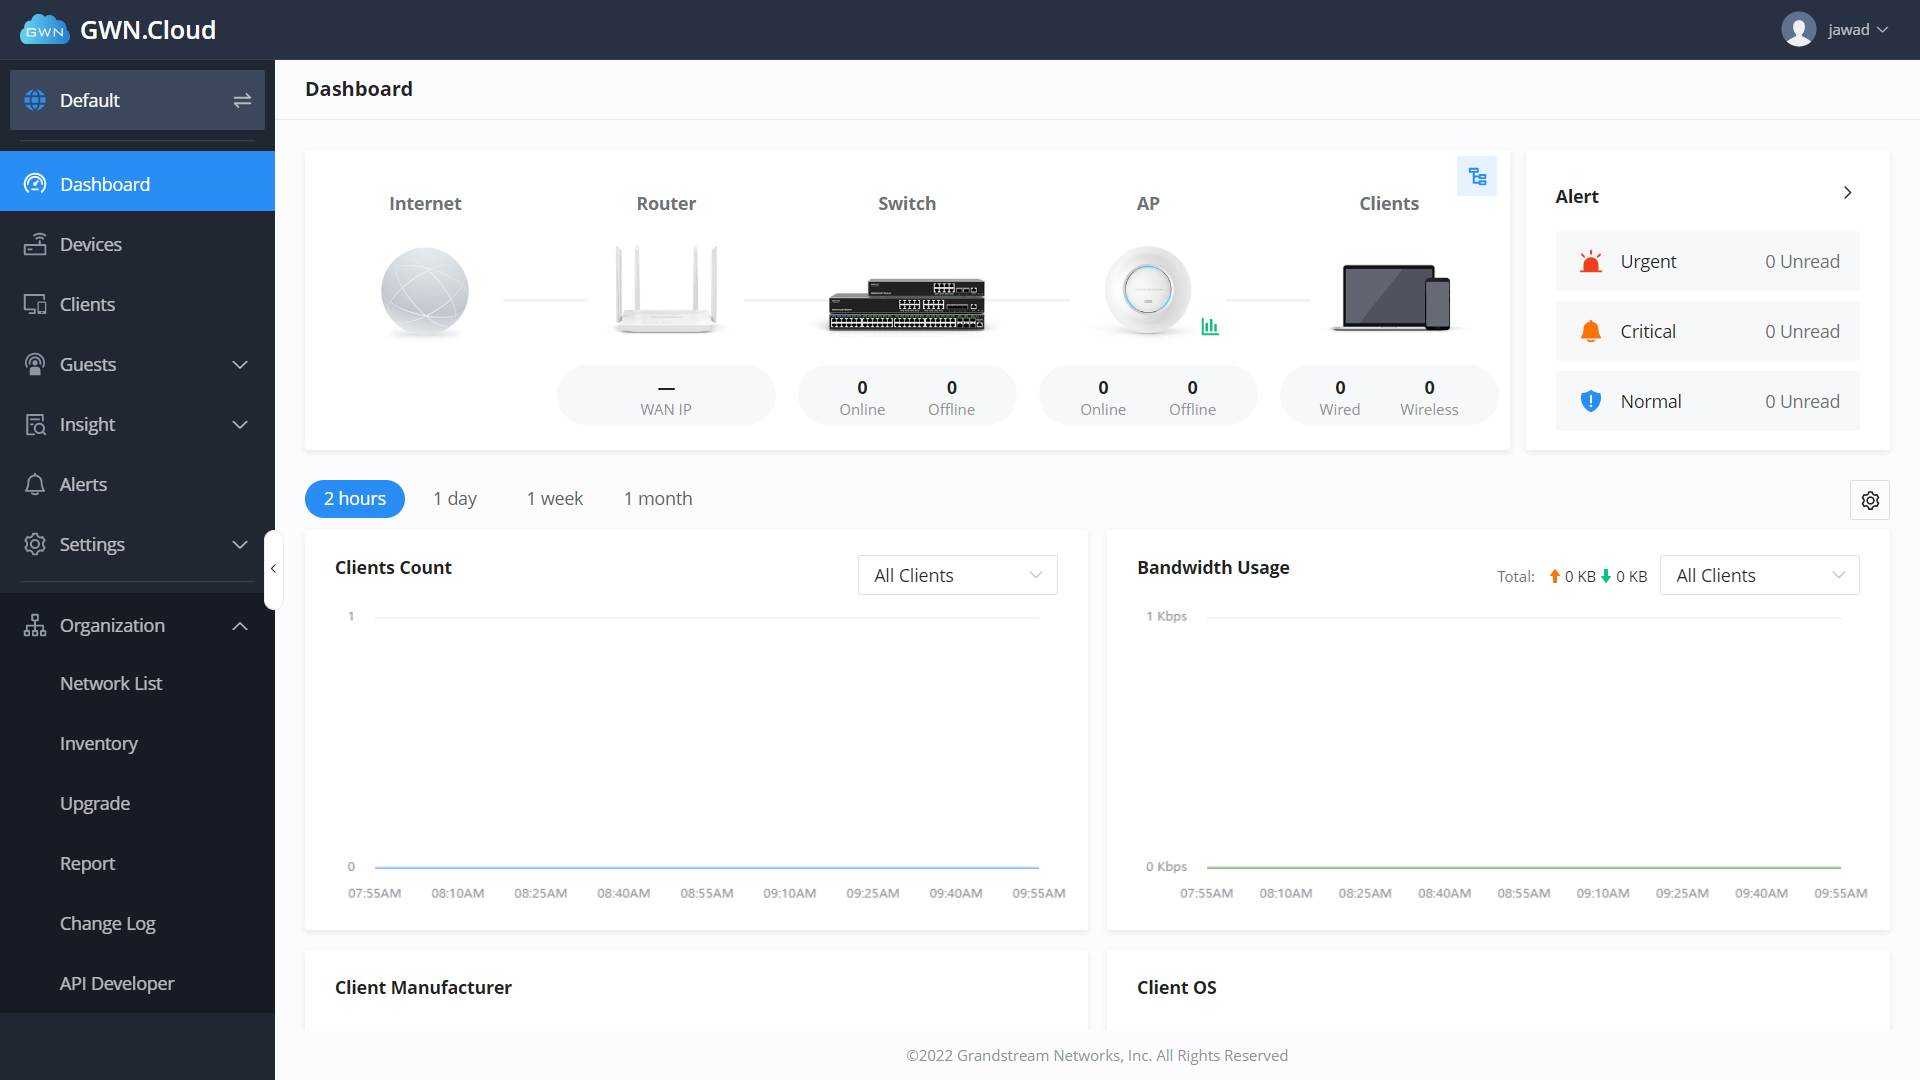
Once you have access to your GWN management platform, whether it is GDMS Networking or GWN Manager, there are nine major menu items to familiarize yourself with:
- Network List: At the top of the menu list is the current deployment/network site that is being managed. You can use this button to change from one of your deployment sites to the next.
- Dashboard: The dashboard is the default menu item that is displayed whenever you sign in. It provides an overview of the deployment that is being viewed and includes a high-level count of online/offline devices in the selected deployment, client count, bandwidth usage, client statistics, new sessions by SSID, and more.
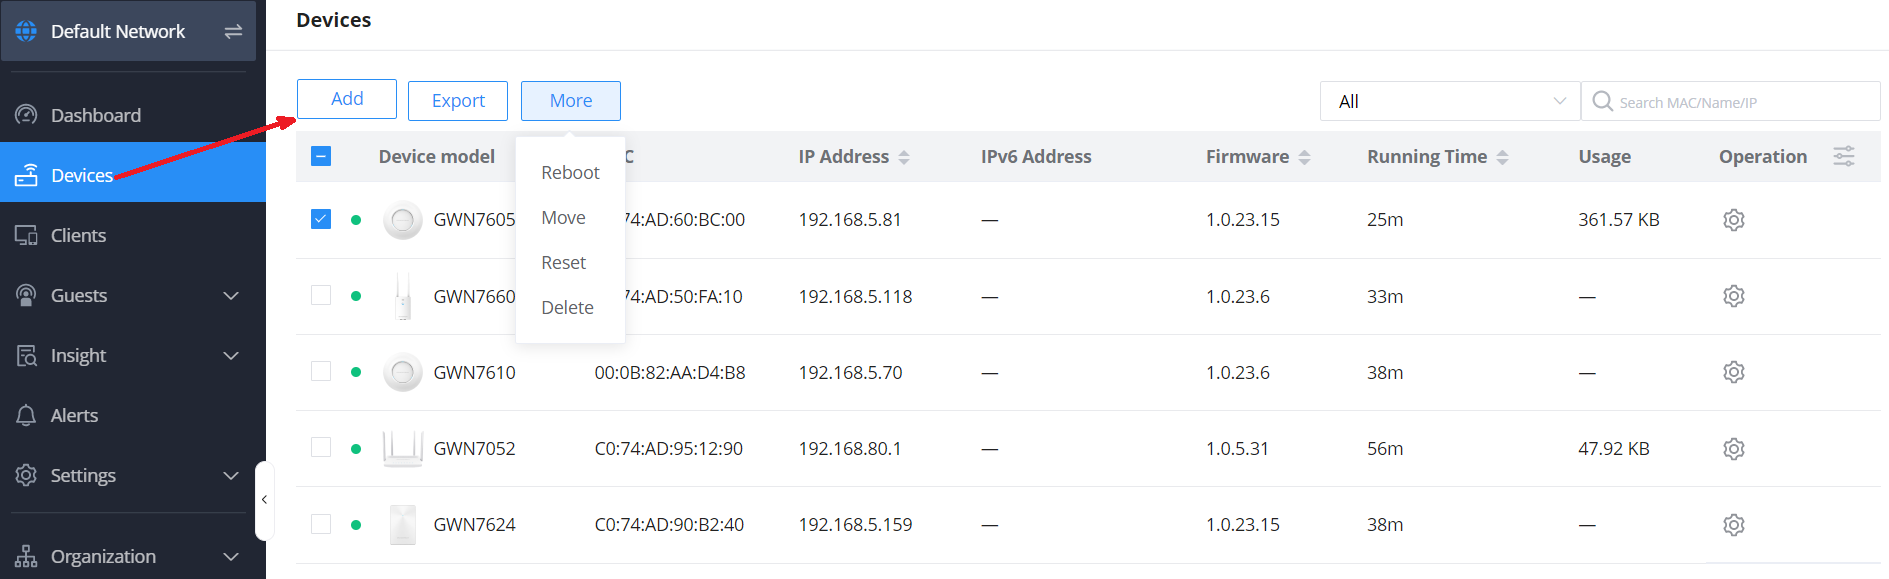
- Devices: One of the most important menu items, the devices tab is where you can add, view, and edit devices that are deployed on a network. All the devices within the network will be presented in the table in this tab, along with their MAC address, model, IP address, IPv6 address, firmware, running time, and usage. Clicking further into the device details will provide menu options to view the GWN product's usage overview, info details, debug features, and configuration settings.
- Clients: The clients option will provide a list of all devices that are currently connected to a network. From this table, you'll see the client's hostname, the connection type, SSID, IP address, associated devices they're using for the connection, and total connection time. You can click on each device to adjust their hostname, block the client, set bandwidth rules, DHCP static IP address binding, and also see usage statistics and client information details.
- Guests: A feature specific to voucher captive portals, a voucher group can be made to allow guests to log in via printable vouchers. This supports custom voucher validity times, rate limits, and traffic limits.
- Insight: Insight provides two major features for network optimization; site surveying and a network topology creator.
- Alerts: The alerts tab provides a complete list of all alerts that have happened within a deployment, including the alert details, type, level, and time. No alerts will generate here until they are set up in this menu using the Alert Settings button, where you can then define the system, performance, security, and network alerts.
- Settings: Settings is another vital menu to become familiar with. You will find configuration settings for the chosen network's Wi-Fi/SSID connections, LAN routing, WAN routing, VPN management, traffic management, firewall & security settings, profiles for setting up additional network admins, and general system configurations.
- Organization: The final menu item, Organization is where you go to create new network deployments, view all devices you have deployed across all your networks, upgrade the firmware of your products, and generate helpful usage reports. The organization menu item is not network specific like our other menu items and is a helpful item for viewing and managing your GWN products across all your clients' various sites and deployments.
With a general understanding of the menu items and interface layout of the GWN Management Platform, you can now begin to create a deployment. To begin, click on the Deployment button that was mentioned earlier in this post, and choose Create Network. This network will house the deployment's devices, settings, configurations, client information, and more. Typically, a network will contain the GWN devices being deployed for a specific business or site, however, it can be set up in any way you'd like to group GWN devices together. Once the network is saved, go back to the network list and choose the network name. With the new network selected, all the above menu items will reflect the clients and devices within that network.
Adding and Configuring Devices With the Network
With the new network created, the next step is to begin adding the devices within the network to the management platform. The steps for adding a new device can differ depending on the management platform being used. Both GDMS Networking and GWN Manager have options for adding these devices manually or adding these devices automatically.
GDMS Networking
- Adding Devices Manually: Within the Devices menu, clicking "Add" will bring up a prompt that will allow you to input the name, MAC address, and Password of a GWN product. The MAC address and password for a GWN device can be found on either the package or the underside of the GWN model.
- Adding Devices using the GWN App: The GWN Application is available for both Android and iOS devices, and can be downloaded on the respective device's app store. Once the application is downloaded and signed in, click into the network you'd like to add devices to, choose the Devices menu item, then click the "+" sign. This will bring up your camera, which can be used to scan the barcode from the GWN model's sticker.
- Transfer from Local GWN Access Point Master: An existing GWN network deployment can be transferred to GDMS Networking via an option on the network's local GWN access point that is acting as the network's controller. Once logged in to the local master access point and viewing all GWN access points, the "Transfer AP" button can be selected, and then your GDMS Networking network is chosen.
GWN Manager
GWN Manager recently had significant firmware updates, which included improved performance and increased device/client management capacity. When using GWN Manager, there is an "Adopt" button that is available on the Devices menu. By clicking this button, GWN Manager will scan and detect all available GWN devices within your LAN and present them to you in a pop-up. You can then parse through these devices and choose the devices you'd like to add to the GWN Manager software. There are two ways that these devices are discovered in this process.
- Automatic Discovery: If GWN Manager connects to the same local subnet as the GWN devices, it will discover these devices automatically through the devices' layer 2 broadcast. GWN devices accept DHCP option 224 encapsulated in option 43 to direct the controller.
- Manual Discovery: It is possible to SSH into GWN devices and utilize the menu to set the GWN Manager address and port. You can also log into the WebUI of an access point and set the GWN Manager address and port there as well.
- Adding Devices using the GWN App: The GWN Application also works for GWN Manager. Once the application is downloaded and signed in, click into the network you'd like to add devices to, choose the Devices menu item, then click the "+" sign. This will bring up your camera which can be used to scan the barcode from the GWN model's sticker.
With devices added to the network, the next step is to begin configuration. Each device can be selected in order to review their usage reports, information details, debug options, and of course configuration settings. From the device's configuration menu, you'll be able to adjust settings unique to that device. For our example that has a GWN7624 Wi-Fi access point, here you'll find VLAN settings, band steer settings, the 2.4GHz and 5GHz channel/radio settings, and more. Global Wi-Fi, LAN, Internet, and VPN settings can be adjusted via the Settings menu option.
Network Settings Configuration
With device settings configured and chosen, the next step is to adjust the network settings. Wi-Fi, LAN, Internet, VPN, Firewall/Security, and other major network configurations can be adjusted through this menu. A significant part of any GWN networking scenario, the configuration options under the submenus located here will enable you to customize your deployment completely, all from one place.
Wi-Fi
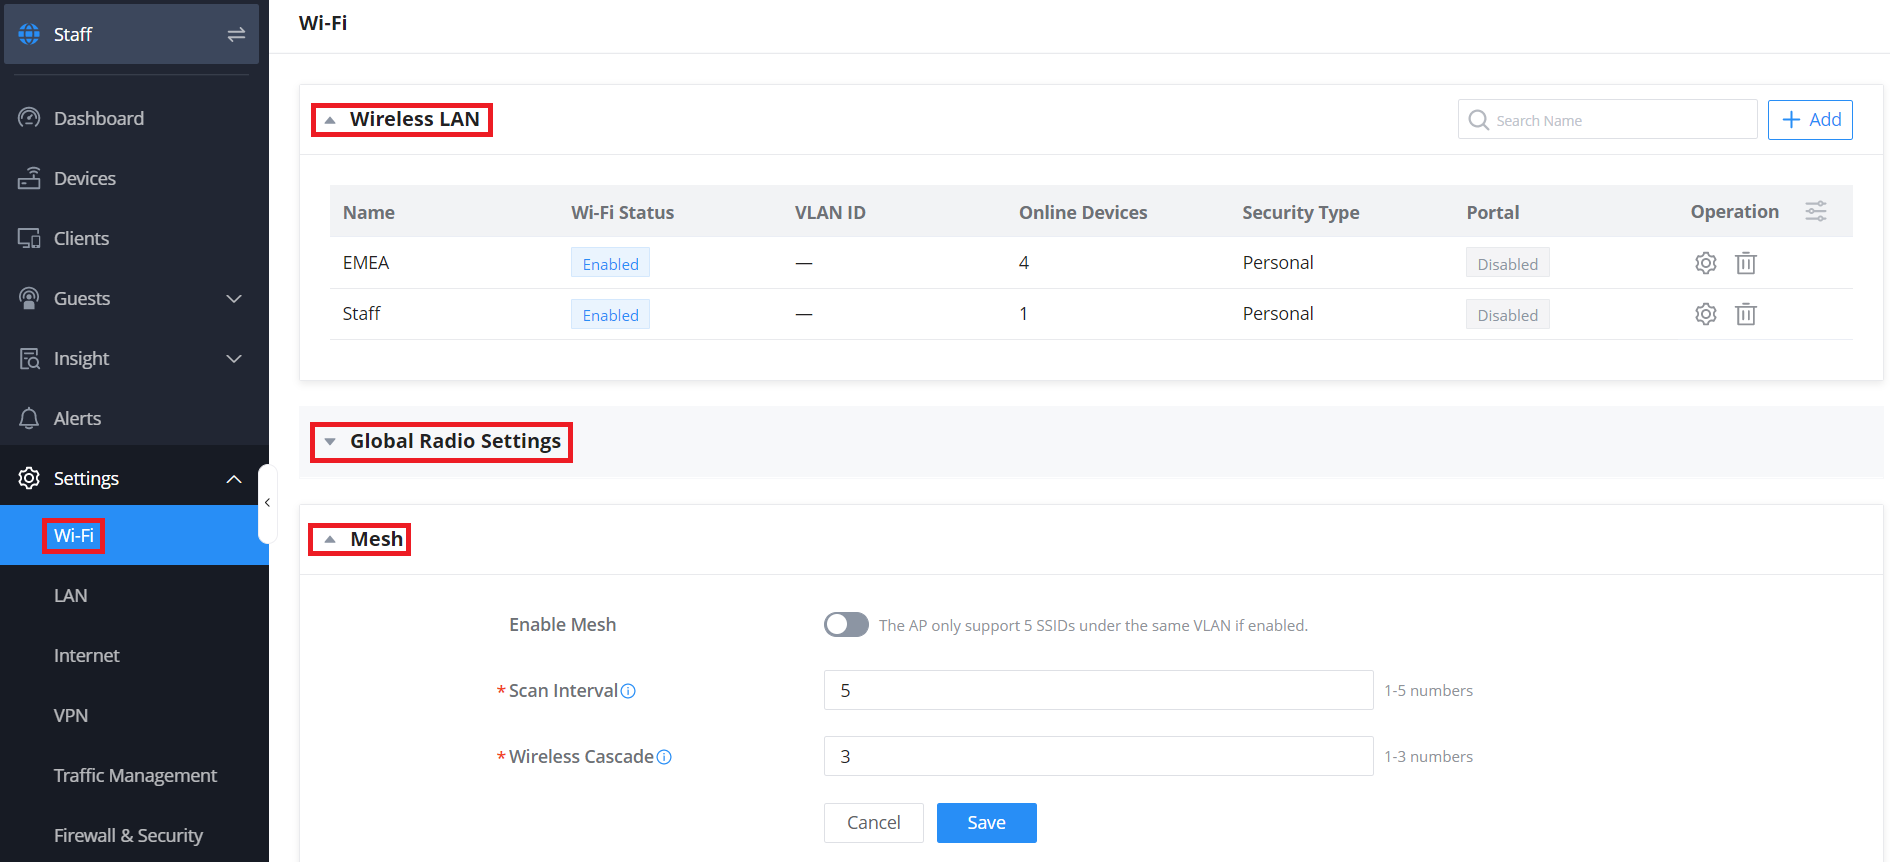
Through the Wi-Fi submenu, you'll be able to find the configuration categories needed for the Wireless LAN, SSID, Global Radio Settings, and Mesh settings. When a GWN Wi-Fi access point or router is added to a network, an SSID needs to be created first in order for Wi-Fi clients to begin utilizing them. All of these devices come with a default SSID, which will be populated in the SSID options available in this submenu. When configuring a new wireless LAN, you must first name your SSID and then can choose the options for access security, captive portals, access control, and assign devices. Once configured, the SSID will populate under your Wireless LAN list. Wi-Fi devices within the network will also take on the Global Radio settings, which can be found under this submenu if they are configured to do so via the device's menu. Band steering, client steering, client access threshold, and beacon intervals are examples of available global radio settings that can be automatically pushed to GWN Wi-Fi access points and routers. Lastly, Mesh options can be customized under this submenu to enable Mesh across your network.
We have an additional technical document on Mesh deployments with Grandstream GWN devices, which can be found here.
LAN
LANs and created VLANs for the GWN network deployment will display under this submenu. Note that you will not be able to create a LAN/VLAN for this network without a GWN device that supports it, such as our GWN routers. To begin adding and customizing your LAN/VLAN, simply click the "Add" button at the top of this submenu. From here you can name the LAN, create an ID, assign a gateway, and configure IPv4 and IPv6 settings.
Internet
Internet-related settings and uplink can be configured here. You can also use this submenu to quickly view WAN physical ports, MAC addresses, connection types, IP addresses, and more via your GWN router. Within WAN port configuration, you'll find the connection types, MTU, VLAN tagging, IPv6, DDNS settings and more.
Firewall and Security
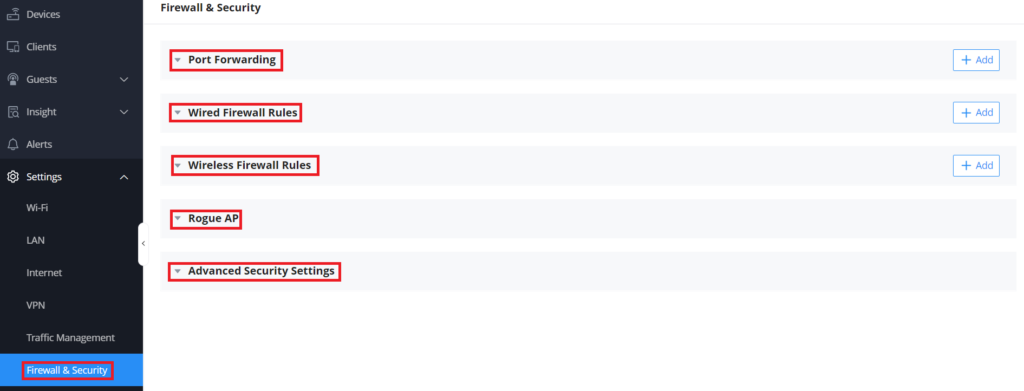
The final major submenu to configure is the Firewall and Security capabilities of your network. Within this menu, items like Port Forwarding, Wired Firewall Rules, and Rogue AP detection can all be configured. When creating public services such as web servers, FTP servers, e-mail servers, or other specialized internet applications, you'll be able to name the port, choose protocol type, adjust destination groups, and more through the Port Forwarding options. Wired and wireless firewall rules can be leveraged to control outgoing and incoming traffic from clients connected to the LAN and through GWN access points. Complete traffic usage can be customized over wired and wireless channels to ensure that only the devices that are intended to be using the network are utilizing it, which is especially important in high-security networks. These settings can also be used to adjust incoming and outgoing traffic from clients to put in place policies that either deny or permit traffic based on protocol type, specified SSIDs, and destination URLs. For large GWN Wi-Fi Access Point deployments, the GWN management platforms' Rogue AP options allow you to set up alerts that will trigger when there may be a malicious intrusion into a GWN Wi-Fi access point.
Profile Options and Settings
With network devices added, their configurations set, and the network's settings created, the final step to finishing your GWN network deployment is setting the profile. This submenu is also located under the network's Settings menu, however, it is home to many of the major configuration options that may be needed throughout the deployment. Within this blog post, we're going to cover three of the major GWN features that are adjusted here. To familiarize yourself with all of the features, go to our technical documentation here.
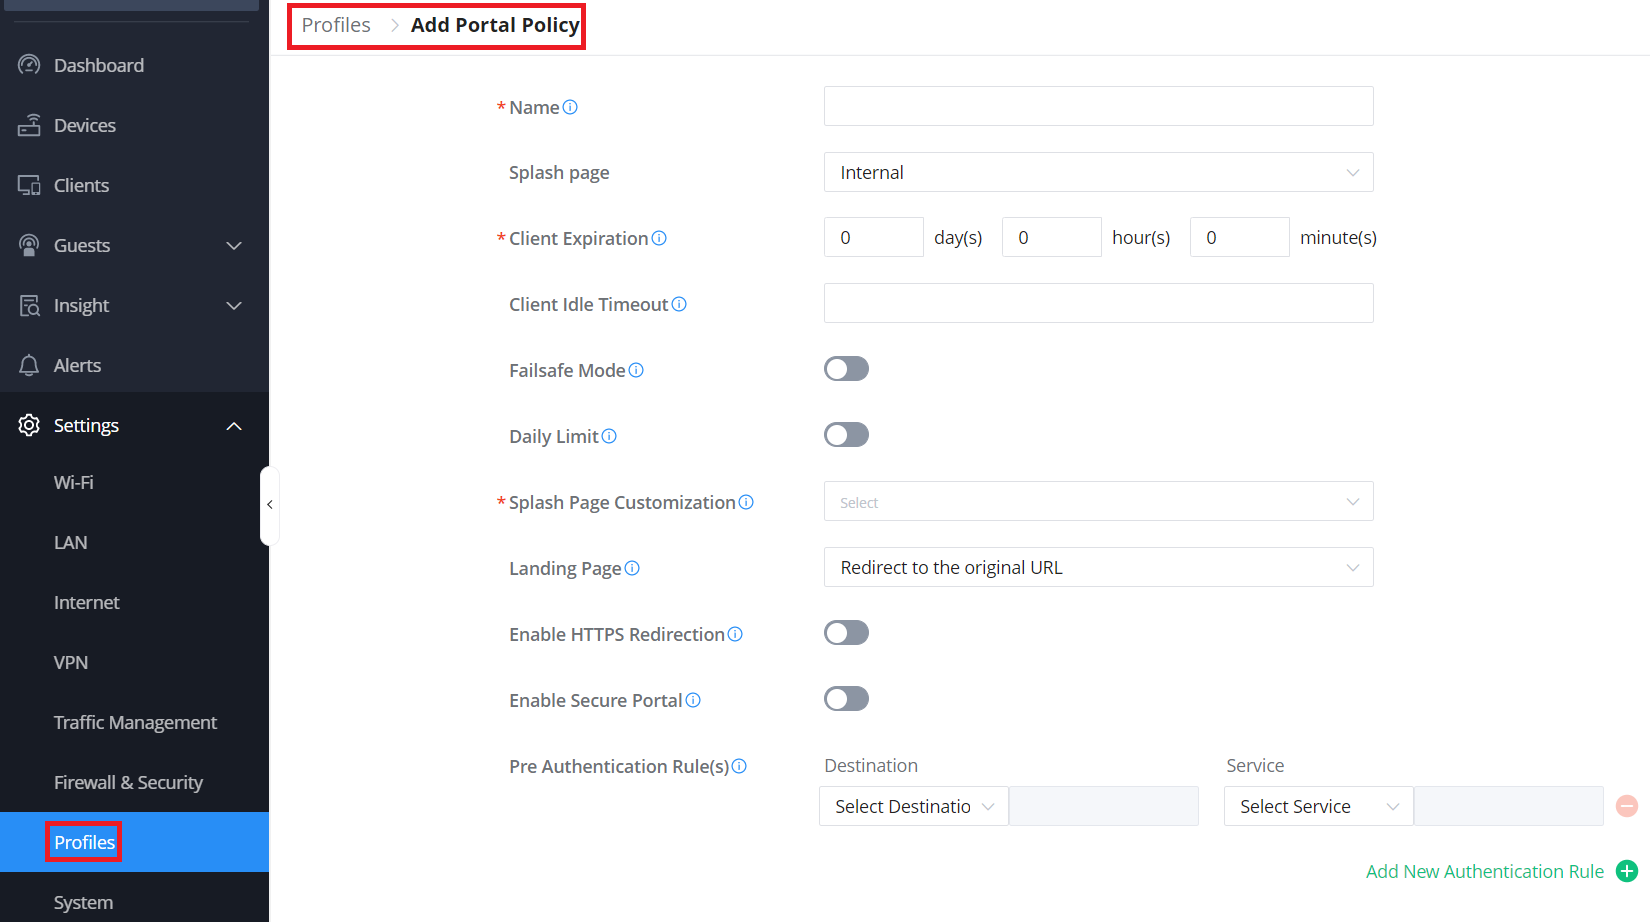
Portal Policy
Policy configuration directly impacts captive portal policies, which will then be applied to SSIDs. Within this page, you'll find options for different authentication types that can be easily configured further in the next section. Each SSID is assigned a different captive portal policy, from requiring a sign-in authentication, social media account token authentication, or simply being redirected to an external or internal Splash page. Outside of this, configurations like client expiration rates, daily limits, and client idle timeout can all be defined.
Splash Page
Through the Splash page options, you can easily configure the menu that is generated when a user is attempting to access a Wi-Fi connection through the SSID that is configured to have the corresponding captive portal. When adding a new splash page, you'll be able to see a live visualized preview that will change depending on the adjustments that are made. From here, you can configure the authentication type for the splash page, add a company logo or picture, customize the layout and colors of the splash page, and lastly customize the Terms of Use text.
Bandwidth Rules
The final key Profile setting to adjust for a deployment is the Bandwidth Rules option. Bandwidth rules can be leveraged within a network to restrict the amount of bandwidth utilized by an SSID or even by a client (through a MAC address or IP address). As an example, for a business whose GWN Wi-Fi network is split between a guest SSID and an employee SSID, bandwidth rules can be put in place for the guest SSID to ensure that employee network access and performance are not impacted by it.
Ongoing Maintenance and Troubleshooting
Now that you've learned about the GWN management platforms' capabilities, added devices and configured the network, and lastly adjusted the network's Profile options and settings, your deployment should be ready for use. As we have covered in the previous sections, you can use the Devices, Alerts, and Client menus to monitor your GWN deployment and ensure it is performing as expected. Device firmware upgrades can also be pushed from the Device menu, the Upgrade submenu that is under the Organization menu, or through the Schedule feature that is found under the Profiles submenu.
If you're interested in a more in-depth, step-by-step guide on our GWN management platforms, watch our video below on how to use GDMS Networking.