Did you know that converting your outdated analog phone system into a powerful VoIP network is almost as easy as plugging your charger into a power socket? Long gone are the days of complicated and costly implementation processes. Thanks to improved technology, upgrading to VoIP just got easy.
In the late 90’s the telecommunications industry started using a newly developed digital transmission technology in telephone equipment that improved its speed, quality and cost. Little by little, IP capabilities were added to switches, followed by a software that allowed users to attach an analog telephone adapter into phones. This essentially made the process of converting simple analog technology to VoIP hassle-free.
Many organizations realized that having voice and data communications travel on the same network saved them money. It also created one manageable network that simplified business communications. In the end, going VoIP was an easy decision due to its many advantages. But perhaps the best part is the option of using ATAs to upgrade without having to switch to expensive IP endpoints— all that is needed is an Analog Telephone Adapter (ATA).
What does an ATA do?
It basically converts analog or digital technology into VoIP. Companies looking to create a high-quality and manageable IP telephony solution turn to ATA’s because of their many features. Features like superior voice quality, advanced VoIP functionality, security protection and auto provisioning. Grandstream has developed the perfect combination of featured-packed and a compact size design in their ATAs. Other desirable features include: advanced telephony features including 3-way voice conferencing, a wide range of caller ID formats, call transfer, call forward, call-waiting, do not disturb, message waiting indication, multi-language prompts, flexible dial plan. Security won’t be an issue either, with TLS and SRTP encryption to protect your communications.
Ready to upgrade?
Do you have an ATA? What about VoIP service through an ITSP? If you’re looking for an ITSP, see a list of Grandstream’s Service Provider partners, here. Once these items are checked off you’re on the road to analog to VoIP conversion.

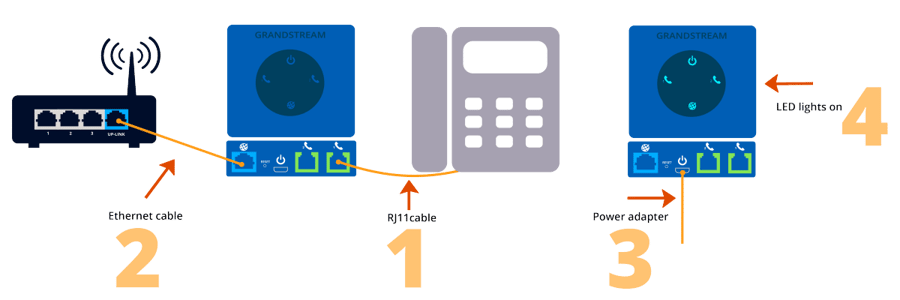
Follow these steps to get started:
- First, connect your standard touch-tone analog phone to an ATA using a RJ11 phone cable.
- Next, find the Ethernet cable and connect one end to the internet or LAN port of your ATA, then connect the other end to an uplink port (router or modem).
- Connect the power source to your ATA and wait a few minutes to power up.
- Finally, once the LED lights on your ATA light up, you are ready to make and receive VoIP calls.
Wasn’t that easy? If you are still unsure, check out this Quick User Guide to learn more about the features and advantages of Grandstream’s latest ATA.
Sources:
http://bebusinessed.com/history/voip-history/


.webp?width=250&height=131&name=how-to-use-gdms-q1-2024%20(1).webp)


