


.webp?width=250&height=131&name=how-to-use-gdms-q1-2024%20(1).webp)


Grandstream Device Management System (GDMS) and UCM RemoteConnect empower installers with a cloud-based solution to easily manage all of their Grandstream IP PBX and IP endpoint deployments before, during, and after the project. These platforms come together to allow an installer to not only manage the entirety of a client's solution from the cloud but also to expand that deployment network to remote employees or satellite offices by utilizing UCM RemoteConnect. Within this blog post, we're going to be covering how GDMS and UCM RemoteConnect come together to offer a game-changing Grandstream configuration and management solution for installers. In order to get started, create an account on GDMS. UCM RemoteConnect is also accessed through the GDMS platform account.

Getting Started – Sites and Devices
The key function to be familiar with when managing a deployment via Grandstream Device Management System is importing the endpoint devices and UCM6300 IP PBX that will be managed through the cloud and organizing them into various deployment labels, called 'sites'. Both sites and devices can be imported in bulk by utilizing Excel templates that can be downloaded directly from the platform when selecting the ‘import’ option. By utilizing sites, installers can separate and organize customer deployments within the Grandstream Device Management System. This allows for the management of all customer solutions from one source. ‘Child Sites’ that are subordinate to ‘Parent Sites’ for more complex networks. It is important to always create a Site prior to importing and adding devices on the GDMS platform.
Keep in mind, sites don’t have to be physical locations. Sites are used to organize devices in whatever categories are appropriate. It could be a specific subscription type for SIP/ITSP services, a department within a company, or even a specific individual. When it comes to managing a site's Grandstream's UCM6300 series of IP PBXs, this can be done through Grandstream Device Management System. From the GDMS dashboard, navigate to the left bar menu and click on the “UCMRC” tab. There are three options.
- UCM Device – Add, configure, and manage UCM6300 IP PBXs
- UCM Backup – Backup UCM configurations to ensure easy rollbacks of any UCM6300 IP PBX
- Call Quality – Monitor call quality of remote VoIP devices that are using UCM RemoteConnect’s NAT firewall traversal to connect to a central UCM6300 IP PBX
Adding a UCM6300 IP PBX can easily be done either individually or in bulk. To add a UCM6300 IP PBX in both cases, the device’s name (used for organizational purposes), MAC address, initial password, and desired Site are required. A UCM’s MAC address can be found either on the device’s physical label or within the UCM’s web GUI under the System Status > System Information > Network page. The UCM’s initial password is the randomized original password assigned to every UCM6300 IP PBX, which can be viewed via the UCM’s LCD or on the UCM’s label. Once this information is provided, a GDMS Site must be selected to associate the IP PBX to.
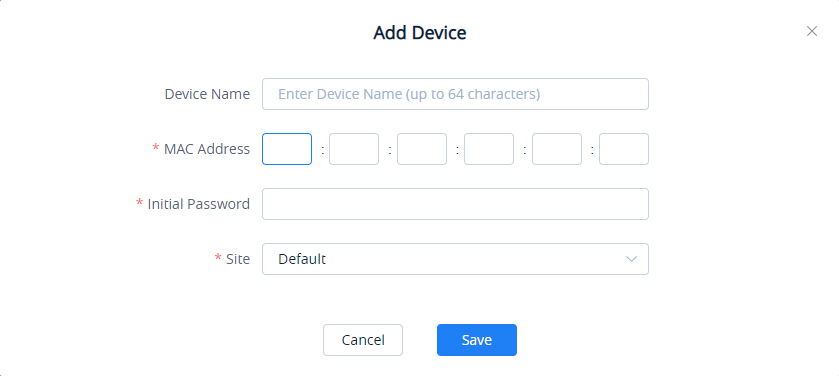
Screenshot Example of Adding a UCM on UCM RemoteConnect
Creating Endpoint Configuration Templates
Once a deployment site has been created and a list of endpoint devices and an IP PBX is related to the site, the next step is to begin customizing the configuration templates for the endpoint devices that are being deployed based on a client's needs. These templates are essentially configuration files that can be pushed in bulk to endpoint devices within the deployment site. Once a configuration template is created and associated with a device, it will automatically be pushed to the device when it is brought online and connected to the internet. There is also the option to manually push configuration templates at any point, which is particularly useful if deployments need to be revised and adjustments made to the phones. It is important to know the difference between the 3 configuration template options.
Model- When configuring by model, an installer first chooses the model that they wish to configure and chooses to associate it with a specific, several, or all sites. The template then needs to be named to keep the configurations organized. When the devices within the specified site(s) that share that model type are brought online for the first time, the GDMS will push the configuration template to the devices automatically.
Group- The group option enables bulking similar model types and pushing one configuration template to all of them. From there, it is possible to customize a configuration template and then edit it. When using this configuration option there are specific model categories that have devices that can be chosen and edited, such as DP DECT phones, HT ATAs, and GXP/GRP phones. Bulk configuration templates may have feature options that aren’t available on some of the devices selected. These feature options will not be pushed to those specific devices since they are unsupported.
CNF Template- Finally, it is possible to import premade configuration files for specific devices. Once that specified configuration file is uploaded and related to the device, it can be pushed out through the GDMS portal. The uploaded file must be in XML format and named as the device’s MAC address.
Configuring a Deployment's UCM IP PBX
Through the UCM Device tab on GDMS, an installer can view all the UCM6300’s that they have deployed and registered to UCM RemoteConnect. While viewing GDMS synced UCM6300s under the UCM Device tab, the majority of management options are available under the “Options” column for each UCM IP PBX. Accessing the UCM, automating firmware updates, viewing usage reports, rebooting, backing up the current configuration, restoring configurations, and viewing call quality statistics are all accessible from here.
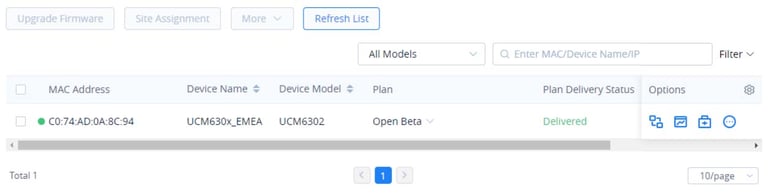
Screenshot of the UCM List on GDMS
Managing and configuring a UCM6300 from UCM RemoteConnect is a very straightforward process from here. On the UCMRC menu and the UCM Device tab, choose the UCM to access after adding it to UCM RemoteConnect. In the Edit Device window, choose either a Personal URL or Custom Domain option for remote access. The personal URL option enables the admin to customize the beginning URL structure of the UCM that they will be accessing, _________.b.gdms.cloud. If the Custom Domain option is selected, the network admin can instead enter a full URL as the custom server address, configure the private keys, and certificate. Once this is done, the UCM IP PBX can be accessed via the login option on the UCM Device tab. Once the button is clicked, a new web page will be opened with the UCM’s web UI login page that can then be accessed via the typical login credentials.
More information on adding, configuring, and managing a UCM IP PBX on UCM RemoteConnect can be found in our technical documentation here.
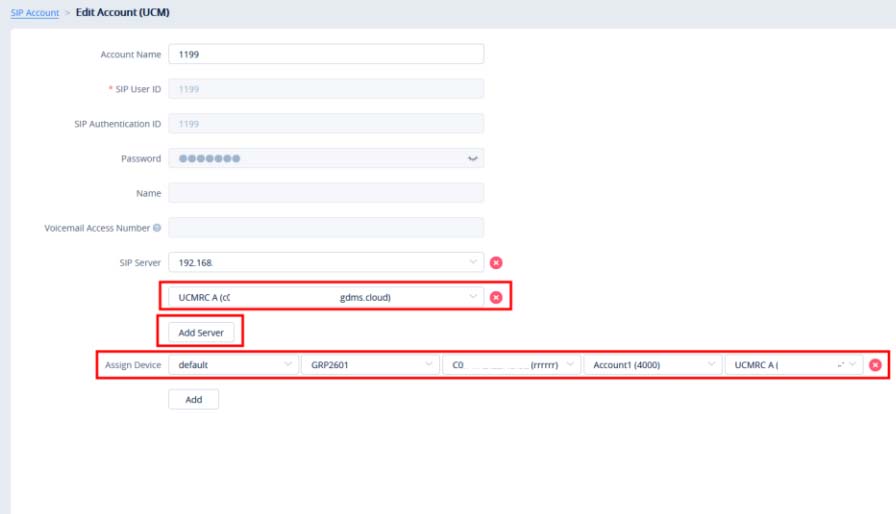
SIP Account Management
The last step for configuring a deployment from GDMS is to add a SIP Server and align the SIP Accounts to the site's devices. First, an installer needs to define the SIP Server that will be utilized for specified devices within a site. After this, an installer can begin creating SIP Accounts under that SIP Server and assign devices to those accounts. When selecting these devices, first select the device model, then select the relevant MAC address/specific device, and finally assign the account index to the device. If the chosen account is already configured, the account number will be displayed. The deployment is now completely configured, customized, and ready.
Configuring UCM RemoteConnect’s NAT Firewall Traversal Feature
Some deployments require remote workers and satellite offices to be able to connect to the central office's UCM IP PBX network. UCM RemoteConnect allows installers to manage their UCM6300 series IP PBXs remotely, and its second major feature is built-in NAT Firewall Traversal. The benefit of this feature is straightforward and very impactful for deployments that need to account for remote users. Remote devices can utilize the NAT Firewall Traversal to seamlessly connect to a deployed UCM6300 as if the phone was deployed within the same LAN as the UCM. This allows the installer or IT manager to painlessly configure and manage the device in the same way they would for any device within the communication deployment. Best of all, it bypasses the need to set up complicated VLANs or VPNs in order to have a hybrid on-site and remote work solution. With this feature, a business can have the easy infrastructure of a cloud communications solution with the customizability and control of an on-site device.
To get started with UCM RemoteConnect’s NAT Firewall traversal feature, a network admin needs to first add the UCM6300 IP PBX that they will be using to UCM RemoteConnect. Once this is done, the network admin will need to obtain the UCM6300’s:
- Stun Address
- Public Address
- Public TLS Port
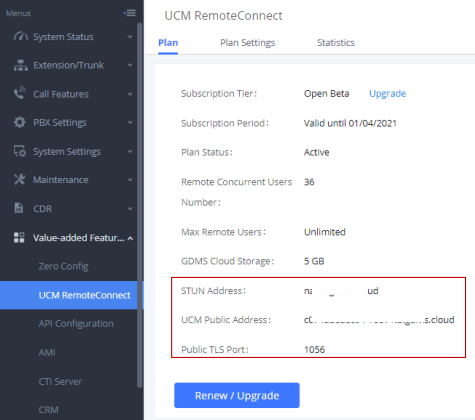
These can be found by logging into the UCM web GUI either directly or via UCM RemoteConnect, navigating to Valued-added Features on the UCM’s web GUI menu, then clicking the UCM RemoteConnect option. Now that the UCM’s Stun Address, Public Address, and Public TLS Port have been obtained, an installer can begin configuring their IP phones to utilize the NAT firewall traversal service.
UCM RemoteConnect has several plan options. Accessing a UCM6300 IP PBX's GUI and managing it from the cloud is completely free, along with limited NAT firewall traversal registered remote devices. However, additional plans are needed for higher registered remote devices, greater concurrent remote voice/video calls/meetings, and more in-depth administration features. To learn more about the UCM RemoteConnect plans, click here.
Configuring an IP Phone to use UCM RemoteConnect’s NAT Firewall Traversal Feature
The easiest way to configure an IP phone to use the NAT firewall traversal feature is through Grandstream Device Management System (GDMS). While configuring a deployment and adding Grandstream devices to the deployment site, an installer/IT admin can easily configure the device’s NAT firewall traversal settings. Through the VoIP Account menu item, select the SIP account option. From here, a new “server” can be created and the UCM public address that was configured prior will be available as SIP server option. This can then be assigned to each phone that has been added to GDMS, which will enable the phone to connect directly with the UCM6300 series IP PBX via UCM RemoteConnect. This can also be done by batches of phones. It is important to note that when configuring the UCM RemoteConnect server address to the phone, the system will automatically configure the phone’s SIP transport as TLS and the STUN server will automatically be configured as the address of the UCM’s TURN service. If a device is not compatible with GDMS, it cannot be configured in this way and will need to be configured manually to utilize UCM RemoteConnect.
Configuring a non-GDMS compliant remote device to utilize UCM RemoteConnect and to be able to register to a UCM6300 series device requires a few extra steps. When configuring an IP phone, enter the UCM Public Address and Public TLS Port for the SIP server, adjust the device’s NAT Traversal to STUN, and configure the SIP transport of the device to be TLS. Minimum and Maximum TLS version for the phone needs to be adjusted to the value 1.2 in order for a connection to be successful. Finally, be sure to configure the STUN server for the IP phone to be the same as the UCM’s STUN Address that was set up previously on UCM RemoteConnect. Once this is completed, the device should utilize UCM RemoteConnect to create a connection and be registered to the UCM IP PBX.
More information on UCM RemoteConnect's NAT Firewall Traversal feature can be found in our technical documentation here.
Tasks, Device Diagnostics, and Alerts
The Grandstream Device Management System goes a lot further than just configuring devices and deployments. It is important to learn how to use the platform’s additional tools that empower integrators and ITSPs alike to manage and troubleshoot their deployments and devices like never before.
Tasks- Automated tasks can be programmed within the platform to help automate the active maintenance of a network. Leading to fewer on-site trips and less time focused on upgrading firmware. Device reboots, factory resets, firmware upgrades, and model or group configuration templates can all be pushed through the Tasks panel. These functions can be set to happen immediately, scheduled for later, or even set to repeat based on a variety of time triggers.
Device Diagnostics- Troubleshooting can begin and hopefully be solved in the cloud with the in-depth device diagnostics tool. Detailed device information, network captures, syslogs, and conduct traceroutes can all be pulled from here.
Alert Management- Customized alerts can be set to trigger once certain conditions are fulfilled. When using the GDMS, there are three alert levels: high, medium, and low. Alerts can also be emailed and appear in the top right corner of the GDMS platform. No matter what, all alerts will appear in the alert menu. The following are the alerts that can program on the GDMS.
- Account Registration Failed
- Device Factory Reset
- Device Offline
- Device Reboot
- Task Run Failure
Try out the GDMS.Cloud
Now that you understand how to use the Grandstream Device Management System, head over to GDMS.Cloud and create your own account to begin exploring the platform. GDMS allows you to configure, manage, and troubleshoot your deployments from the cloud. Meaning your deployments can be truly turn-key and the time you spend traveling to and being at a customer’s site can be significantly reduced. More devices are being added regularly.
Learn More About UCM RemoteConnect